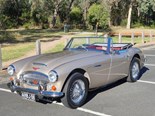
1972 LJ Torana XU-1: Project Purple part 4
 1972 LJ Torana XU-1: Project Purple part 4
 1972 LJ Torana XU-1: Project Purple part 4

 1972 LJ Torana XU-1: Project Purple part 4

 1972 LJ Torana XU-1: Project Purple part 4
 1972 LJ Torana XU-1: Project Purple part 4

 1972 LJ Torana XU-1: Project Purple part 4
|
|
|
1972 LJ Torana XU-1: Project Purple part 4
|
|
|
|
1972 LJ Torana XU-1: Project Purple part 4
|
|
|
|
1972 LJ Torana XU-1: Project Purple part 4
|
|
|
|
1972 LJ Torana XU-1: Project Purple part 4
|
|
|
|
1972 LJ Torana XU-1: Project Purple part 4
|
|
|
|
1972 LJ Torana XU-1: Project Purple part 4
|
Our XU-1 Torana project: Sorting the body
|
|
Project purple - Torana XU-1 part 4
|
1972 LJ Torana XU-1
If you’ve so far followed our series of project cars, including the loud and proud GT-HO Phase III tribute or the mighty HDT Special Vehicles VK, you may have picked up on a common thread. That is, there are three things to consider before you enter the steep and oh-so-slippery slope of a project car. They are: bodywork, bodywork and bodywork.
Project Purple, our XU-1, is proving the case yet again. It looked like a good clean example when Uncle Phil handed over the substantial cheque, and his judgement has proven to be correct. But even with a good one, there’s no getting around the fact a 40-year-old car is going to have one or two little surprises under the skin.
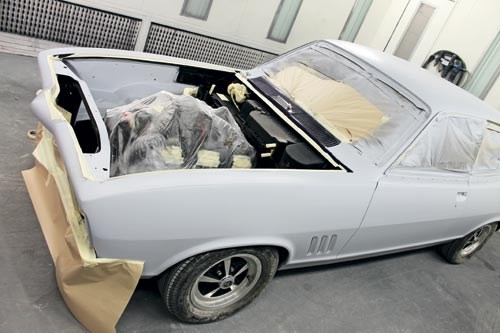
In this case, the big one has been the two different kinds of paint used by previous artisans. Then there were the inevitable rust spots – one on the snout and another where the roof joins a rear quarter panel.
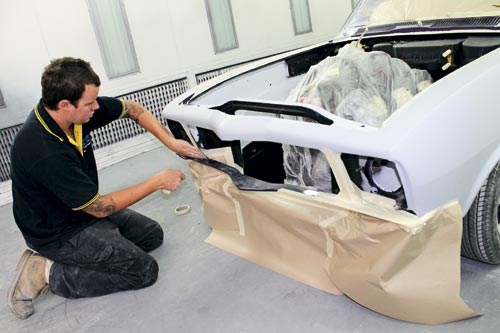
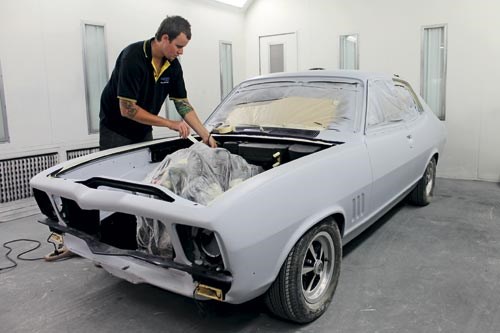
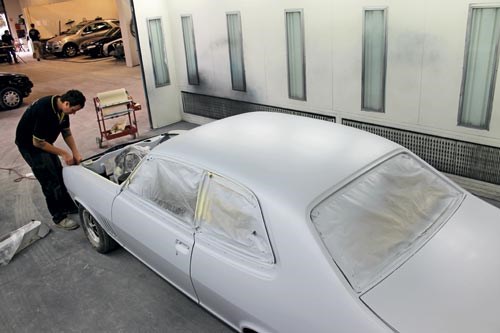
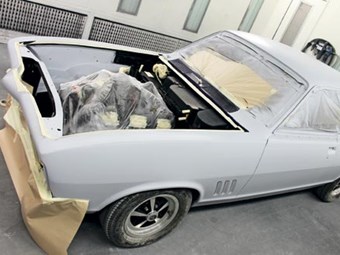
So here we are, a few months into ownership and we’re only just getting to the point where we can think about applying some final colour. Chris from Corporate Auto Body sums up the recent progress: "We’ve put two coats of the Glasurit high-fill across it. We’ve blocked that back and we’ve just done some final pick-ups.
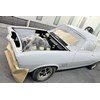
"Because it was a race car, the guards had been flared. We wanted to re-address the lines and ensure they were sharp. It’s been re-primed and that’s it – bodywork done, ready for blocking and painting."
At the Sharp End
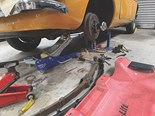
Terrific. Why not have a closer squiz at the sharp end and give that engine bay a bit of a tidy up? The first task was to make room. As we’ve mentioned before, this is not a two-year, 150 grand, rotisserie resto – we have neither the time nor the huge financial resources. Plus, the car really didn’t need it. What we want is a nicely presented LJ GTR XU-1 that looks factory-fresh.
"Obviously the ideal way to do an engine bay is without the engine in it," says Chris. "With our smash repair background, what we do is we take off all the accessories from the skirts, the radio support panel and bulkhead.
"Things like the wiring through the bulkhead to engine we unpick and fold them up on top of the engine, wrap them in plastic and gently shrink wrap them with sheet plastic. What that does is it pulls everything in tight.
"The end result is that it allows us access down each side of the chassis rail, to give us as much room as possible to work with in that engine bay."
Chris’s trade secret for this task is to use overspray plastic, which can be readily bought from any paint supplier. Then you gently shrink it with a heat gun so you end up with a tidy package.
"We ended up stripping it back to bare metal, etch-prime the area and high-fill it," he says.
"Then it’s rubbed ready for paint. It only took an extra couple of hours, and the painter who did it didn’t talk to me for a while, but we’re glad we did it."
Then there’s the detail work. No matter how hard you try, there will inevitably be a few points where you can’t quite get a finger or tool all the way in to fully strip the metal.
The team likes to use what they call an ‘adhesion promoter’, which looks like a clear spray, to ensure the paint holds.
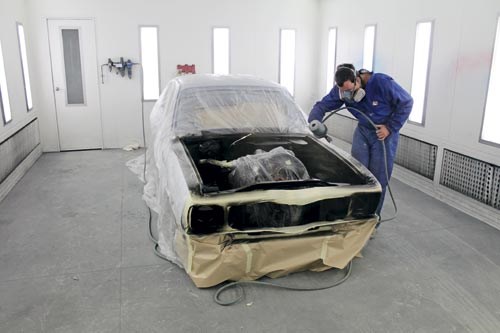
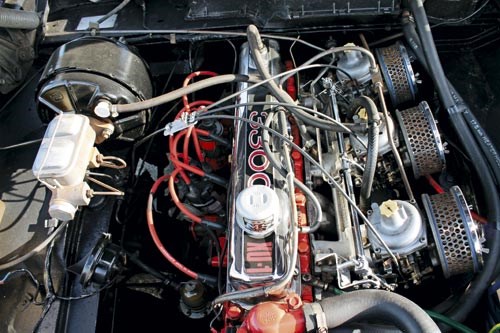
When new, the engine bay had a satin look. So the paint crew have gone for a Glasurit black, covered with a matte-finish clear.
"We’ll bake it for an hour at 60C," says Chris, "then it will sit overnight. Once it’s baked, it’s still soft, so it can bruise easily. We like to let it sit a
couple of days."
Big Secret
For Chris, the secret with this sort of project is not getting too carried away and having a good think before plunging into a resto.
"People see the big-dollar restorations on television," he says. "This Torana would be the bread-and-butter restoration for 95 percent of people who get into car building.
"There will be people who get into their backyard and attack a car with a grinder and get it back to bare metal and all of a sudden they’ve ruined the car.
"Instead, let’s just stand back and have a look at the car. If this car was mine, and I wasn’t in the industry, I’d stand back and ask what’s the most cost-effective way of getting the best result I can. I think this has been the best way." Sound advice for anyone out there with a car ready to restore.
BUYING A TORANA
IF I WAS on the lookout for an LC/LJ Torana, the thing I’d be on the lookout for first and foremost is panel alignment.
With that model the fronts are welded on. Due to the age of the vehicle, chances are the one you are looking at has been in some form of accident – law of averages, essentially.
Rather than unpick a front, or get a new one and spot-weld it on, a lot of people will have tried a bodge repair by pulling it over and you may have panel misalignment. That would be my main concern.
Water can often get into the top of the bulkhead, near the scuttle panel and wipers. It’s a water trap and rust is a big issue.
Where the quarters join the roof, there’s a lead wipe through there and water can get in and give you grief.
As with all cars, look at the bottoms of the front guards and the bottoms of the quarter panels.
But the main one for me is panel alignment – you can fix most other things. If the car’s had a big whack and hasn’t been repaired properly, you’re really starting in a bad place.– Chris, Corporate Auto Body
RARE SPARES 5 CLASSIC REVIVAL TIPS
01 Before you get stuck in with the angle grinder, have a good look around to see what you can realistically repair and replace.
02 Frightening though the prospect might be, work up a rough budget once you’ve assessed what you really need. This might change your mind on how you tackle the project.
03 Don’t be afraid to spend lots of time searching the web and asking around for information. For example, Rare Spares has a comprehensive on-line catalogue for its replacement parts, while any of the trades people you see here will happily give you an estimate on specialist work.
04 When planning, think about the order in which you need to tackle jobs. It will help to keep costs under control.
05 A smart approach is to plan to have the finished car when it’s ready, and not according to some overly optimistic deadline.
Unique Cars magazine Value Guides
Sell your car for free right here
.jpg)
Get your monthly fix of news, reviews and stories on the greatest cars and minds in the automotive world.
Subscribe